How We Migrated to Salesforce in 4 Hours using Hightouch
CRM migrations are painful, but they shouldn't be. Learn how you can migrate your CRM in under four hours.

Kevin Dimond
April 12, 2022
17 minutes
I decided against painfully and manually uploading CSV files, and also ruled out IBM App Connect because I didn’t want to use something that was perpetually stuck in the 1990s. I ended up choosing Tray.io because of my familiarity with the platform, but it was no walk in the park.
I spent weeks building a very sophisticated workflow that would create leads, contacts, accounts, and associated objects in the correct order. It also automatically transformed, on the fly, data from the old data set into the new acceptable values. From system to system we had different sales stages and account-related information picklist fields that had to be translated.
I tested extensively in our Salesforce sandbox instance, only to discover that the sandbox was over six months old and was missing some key permission sets. I spent the better part of my Friday and weekend on the phone with the CTO of Tray to debug these issues because the Tray platform didn’t expose all of the Salesforce API responses.
Luckily, we were able to solve the permission issues and get the workflow to run. But two more unexpected problems arose. First, it took around four hours to move roughly a million records (we didn’t take all of our data with us). Second, any errors it encountered were considered lost records. There was no way for me to catch these errors and retry them again, which was unfortunate. Thankfully, I was able to pick these records back up when our CDP (Segment) attempted to update them again.
Why We Decided to Migrate CRMs at Hightouch
As a PLG company, we decided we wanted to improve our process for tracking product-qualified leads in our CRM. With Salesforce’s capabilities to easily create Leads and convert them into Opportunities, we ultimately made the decision to move to Salesforce.
When our sales leader said that we were moving from Hubspot to Salesforce, I was prepared with all my prior knowledge. I knew what I was getting myself into by volunteering to help with this transition.
Now, this is not to say that Hubspot is not as sophisticated as Salesforce; we actually still use Hubspot for all of our lifecycle marketing campaigns. Our marketing team uses Hubspot and our sales team uses Salesforce. Choosing the right solution for your organization and its objectives is the key to success.
Hubspot vs. Salesforce
I’m not here to sell you on Salesforce or Hubspot. Both are great CRM choices in their own right. However, you must know the fundamental differences between the two systems when it comes to a data model perspective. If you’re looking to migrate from one system to the other, you’re going to need to know the functional equivalent objects between the two systems, as well as any “gotchas” that may arise from their methodology differences.
Let’s get some terminology out of the way and then talk about the one gotcha that we had to account for during our migration. I won’t list all of the object differences between both systems as that would take up a lot of space. But I will show you the list that we were most concerned about during our migration. You’re welcome to click on these links (Hubspot Data model and Salesforce Data model), it’s almost a 1-1 equivalency with some minor exceptions.
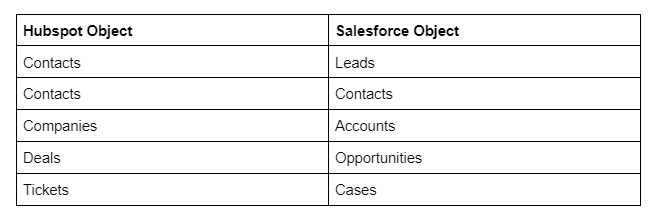
There are two important factors to understand with Hubspot’s methodology of Contacts. Firstly, contacts act as Contacts and Leads. It’s up to you to define what they should be when migrating between two systems. I’ll cover how we handled this later. We also realized that Hubspot allows contacts to be created without associating them with a specific company (or “account” in Salesforce lingo). Hubspot can be configured to require company creation using an email domain to associate new contacts with that domain. This can create problems because you can end up having a deal associated with a contact and not a company.
Why is this a problem? In Salesforce, an Opportunity has to be associated with an Account, and not a Contact. A Contact is a related object to the Opportunity through the data model. Furthermore, there is a notion of contact roles with an opportunity where you can specify the contact's relationship to the opportunity. In Salesforce it’s imperative to have Contacts associated with the correct Account, so you can take advantage of the right CRM experience it has to offer.
Enter Hightouch
Equipped with all that prior knowledge, I knew what I was getting myself into by volunteering to help with the transition. When I joined Hightouch, I could clearly see our customers’ potential use cases. Ironically, one of those use cases was a CRM data migration. What I didn’t know was how easy it was to use our own product. I know, I sound like a corporate shill, but I’m going to demonstrate how easy this was.
In fact, we spent more time configuring Salesforce than we did migrating our data, and that includes the amount of time prepping the data. From start to finish, we migrated all of our data from Hubspot to Salesforce in less than four hours. For your convenience, I’ve broken down the migration into three easy steps: planning, setup, and execution.
Data Planning
First things first. It’s important to set a cutoff time for your team so that they make no additional updates to the data set before you begin your pull. I usually pick a Friday afternoon because if you run into trouble, you can always course-correct over the weekend.
The human element of this process will probably be a pain point. I’ve dealt with plenty of scenarios where I have received a panicked email or phone call from a sales rep about their updates being lost, even after setting and announcing a cutoff time. Depending on your level of compassion for your sales team, you may need to delay or restart this process.
As a rule of thumb, I always give people a little extra time past the cutoff. This buffer of an hour or two can save everyone a headache and extra work. Once the cutoff and buffer time pass, it’s time to download your data. Hubspot has a great feature that allows you to export all of your records per object in XLS, XLSX, or CSV format. For our migration, I needed to export contacts, companies, and deals.
One thing to note: Hubspot can take some time to prepare the files to download, especially if you have a lot of data. You’ll also need to sort out any integrations you have. Disconnect any integrations that may fail or interfere with your exports. They’re not going to be providing a lot of value to you while you’re in the middle of a data migration anyways. If you have a Fivetran job set up to send Hubspot data to your data warehouse, you’ll likely want to pause it
Hightouch is very flexible on how you can load your data into Salesforce or any destination. For this migration, I opted to load these exports into Google Sheets, and use our Google Sheets source to send data to Salesforce. I stored each object as a separate tab on the Google Sheet. For the sake of my sanity, and because I have a touch of OCD, I made copies of the original tabs so that if I made a gross error I could always get back to the original root data. Yes, I know there is an “undo” button in Google Sheets; don’t judge me.
There are some advantages to this approach versus using a data warehouse. We had all of our Hubspot data in Snowflake, but I wanted to be able to edit the data in real-time when I found mistakes. In addition, if I wanted to change the format of a field, I didn’t need to go through type-casting. Not that this is a problem for Hightouch—we can easily do this in the model and through SQL. But again, I wanted to adjust this data visually while I was inspecting it. Due to my RevOps background, it’s hard to pry a good spreadsheet from my hands.
Now, to circle back to our original issue with contacts being either a contact or a lead, we took a cut-and-dry approach. Any contact not associated with a company or deal was treated as a lead. We had hundreds of thousands of these. I won’t get into a lot of specifics of why, but let’s just say, there were some mistakes. For contacts with no company but a related deal, we had to manually create an account for the deal. Thanks to our rigorous sales process, we only had a handful of these.
The last step was to clean up bad data. I found myself purging contacts that looked suspicious or obviously fake. I corrected misspellings and started working on associating contacts to newly created companies on my sheet. There were plenty of situations where I found data through filtering that needed to be either changed slightly or removed entirely. Common misspellings of customer data are not immediately obvious when you’re pulling from a data warehouse. However, when you are visually displaying it in a spreadsheet, and filtering the data, these errors can pop out. I still remember one situation at IBM when someone had spelled Abercrombie & Fitch as "Abercrombie & Stitch".
Contacts that were not associated with any companies were treated as leads. Salesforce requires that Leads have a Company Name. I just used a placeholder of “Fill in Company Name.” This would resolve itself over time as the Lead to Contact conversion process requires you to create an Account and fill it with the appropriate Company Name. Alternatively, you could Clearbit to match against emails to help fill in the gaps. Lastly, I created a catch-all Account in Salesforce for records that I just could not match against. This ended up being very useful because no records were left behind.
Salesforce Setup
You’ll need to do a little preparation work in your Salesforce instance to get ready for this migration. You may have custom fields that you need to create that you had in Hubspot. The most important thing you need to set up is external identifiers so you can upsert your records into Salesforce.
For our migration, I ended up creating an external identifier based on Hubspot ID. The advantage of this was that I could keep Hubspot for a period of time, and if there was any missing or incorrect information, I could see if it happened in transit or if it was originally recorded that way in Hubspot.
Once you have any custom fields set up in Salesforce, and have created any custom objects that you need for your business, it’s almost time to set up Hightouch to sync your records. However, it’s important to note that Salesforce has a very rigid data model with standard objects. You need to follow an order of operations to ensure your records are properly associated with each other.
For this migration, I created records for Leads, Contacts, Accounts, and Opportunities. Salesforce requires an Account before you can create an Opportunity. You have to add Contacts after creating an Account so they are associated properly and not set as private contacts. Leads don’t have any specific requirement other than having a Company Name, Last Name, and Email Address.
Hightouch Setup
Setting up Hightouch is surprisingly easy and you can have data flowing to your end destination in a matter of minutes. For this example, I’ll show you how I set up Hightouch to push data from Google Sheets to our Salesforce instance.
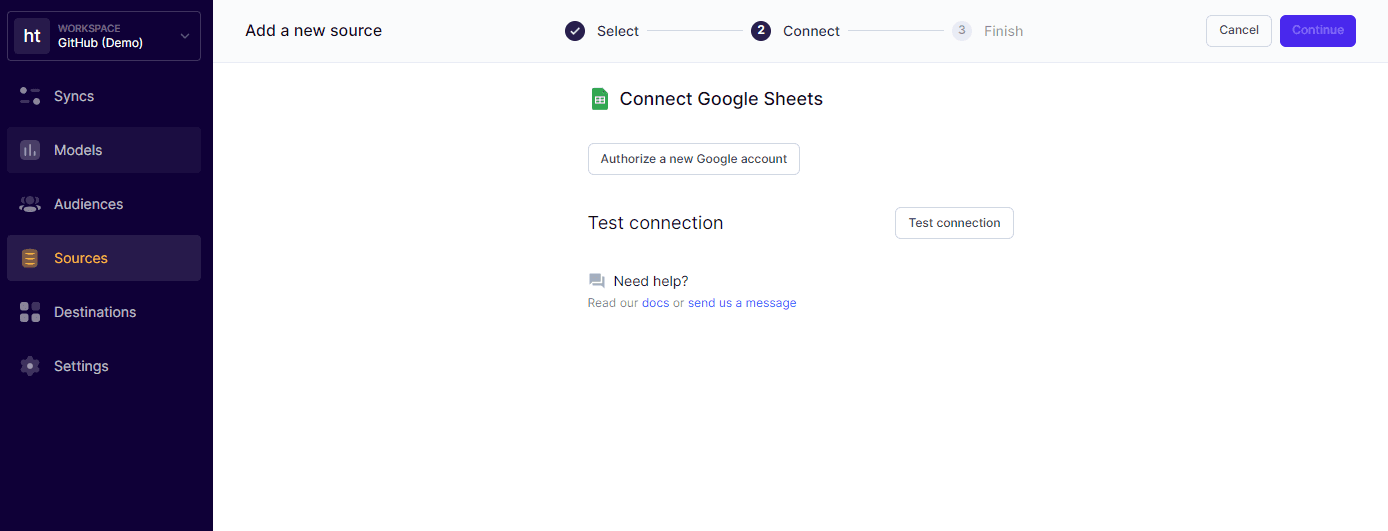
Step 1: Connect to GoogleSheets
To connect to Google Sheets, all I had to do was authorize my Google Account and select which sheet I wanted to use as my data source.
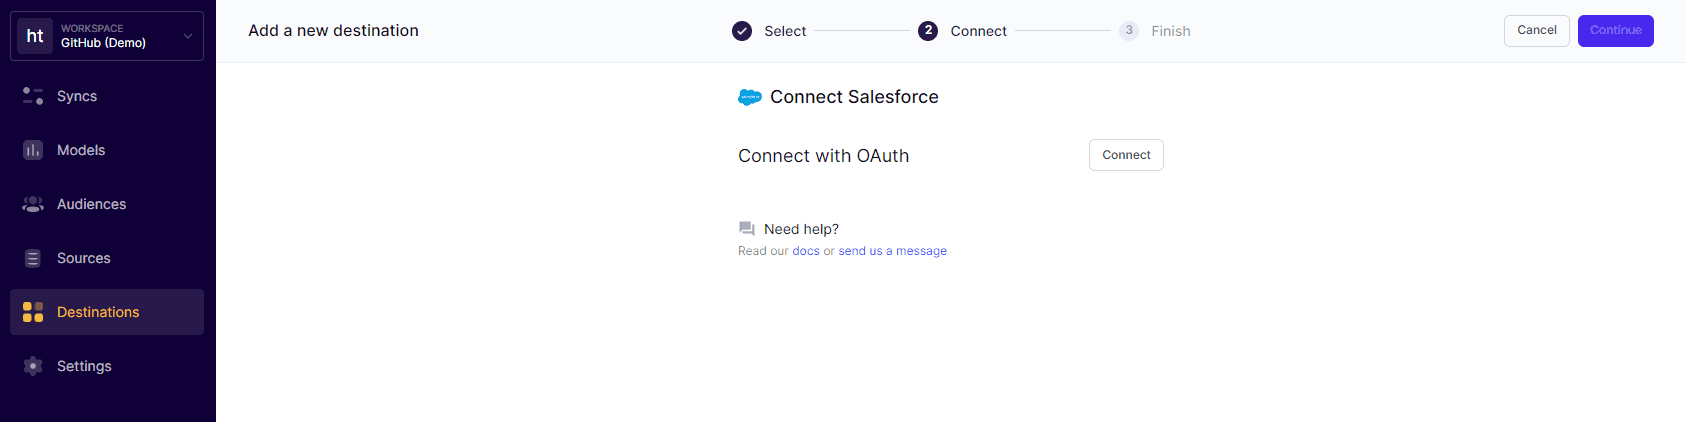
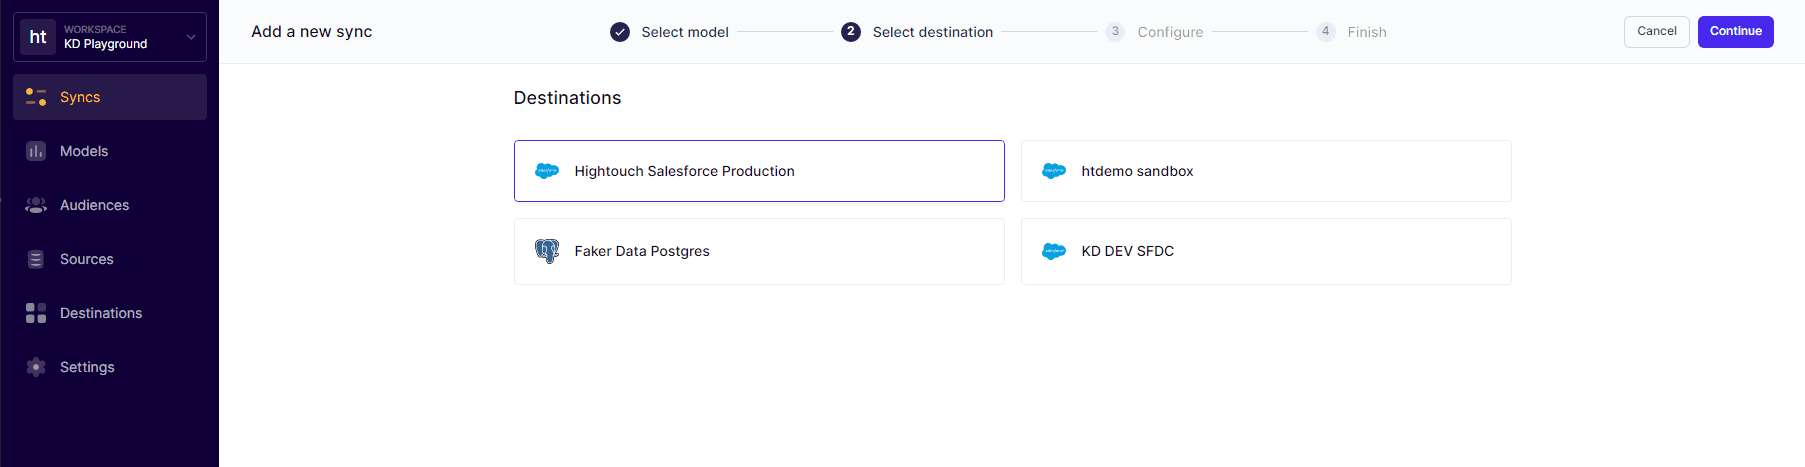
Step 2: Connect to Salesforce
In order to sync the data I had stored in Google Sheets, I first needed to choose my end destination. In this case, it was Salesforce, but it could easily be another SaaS application.
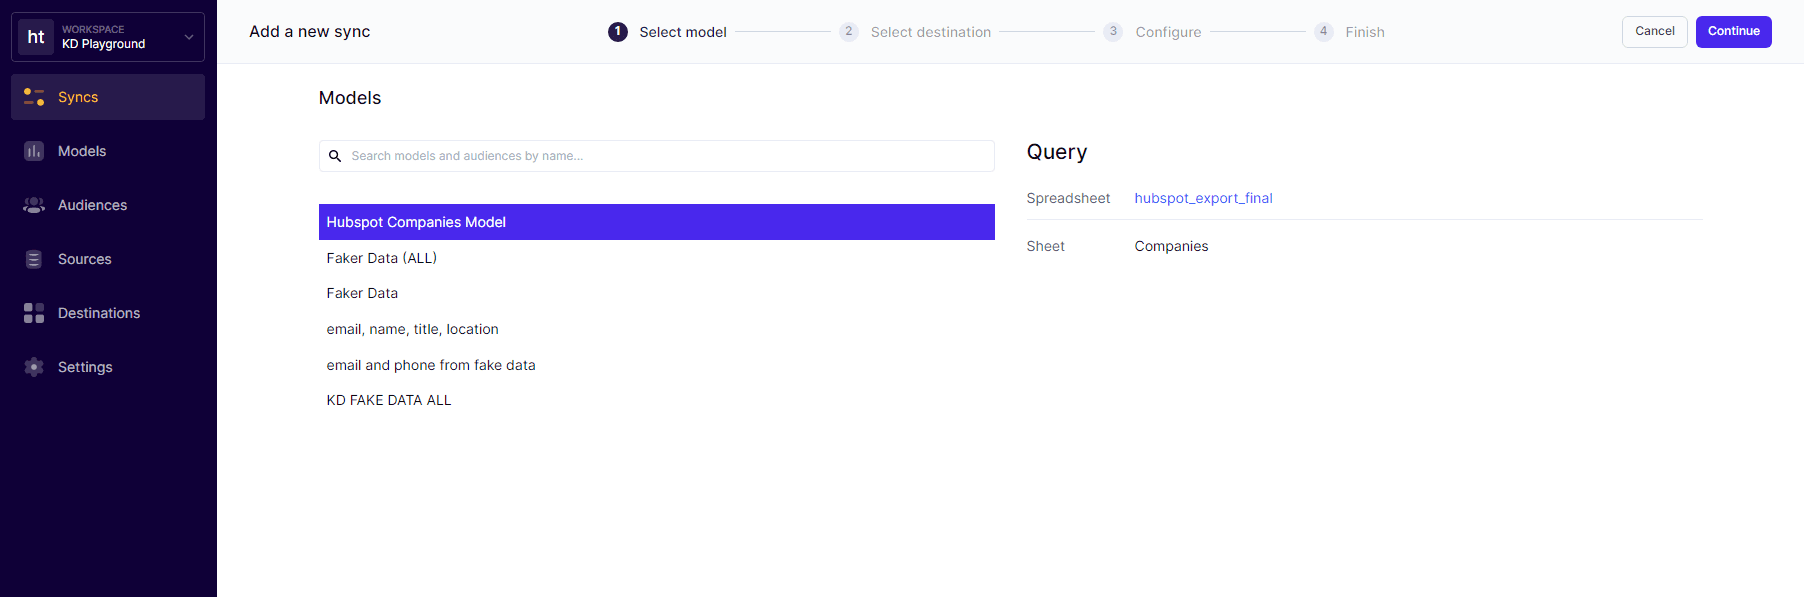
Step 3: Create your data model
Once I had my source and destination setup, the next course of action was for me to simply create my data model. For this scenario, I just wrote a simple “select * from Sheet1” statement in SQL and saved that as my model and saved it in Hightouch. This way, I could choose whatever fields I wanted in our field mapper.
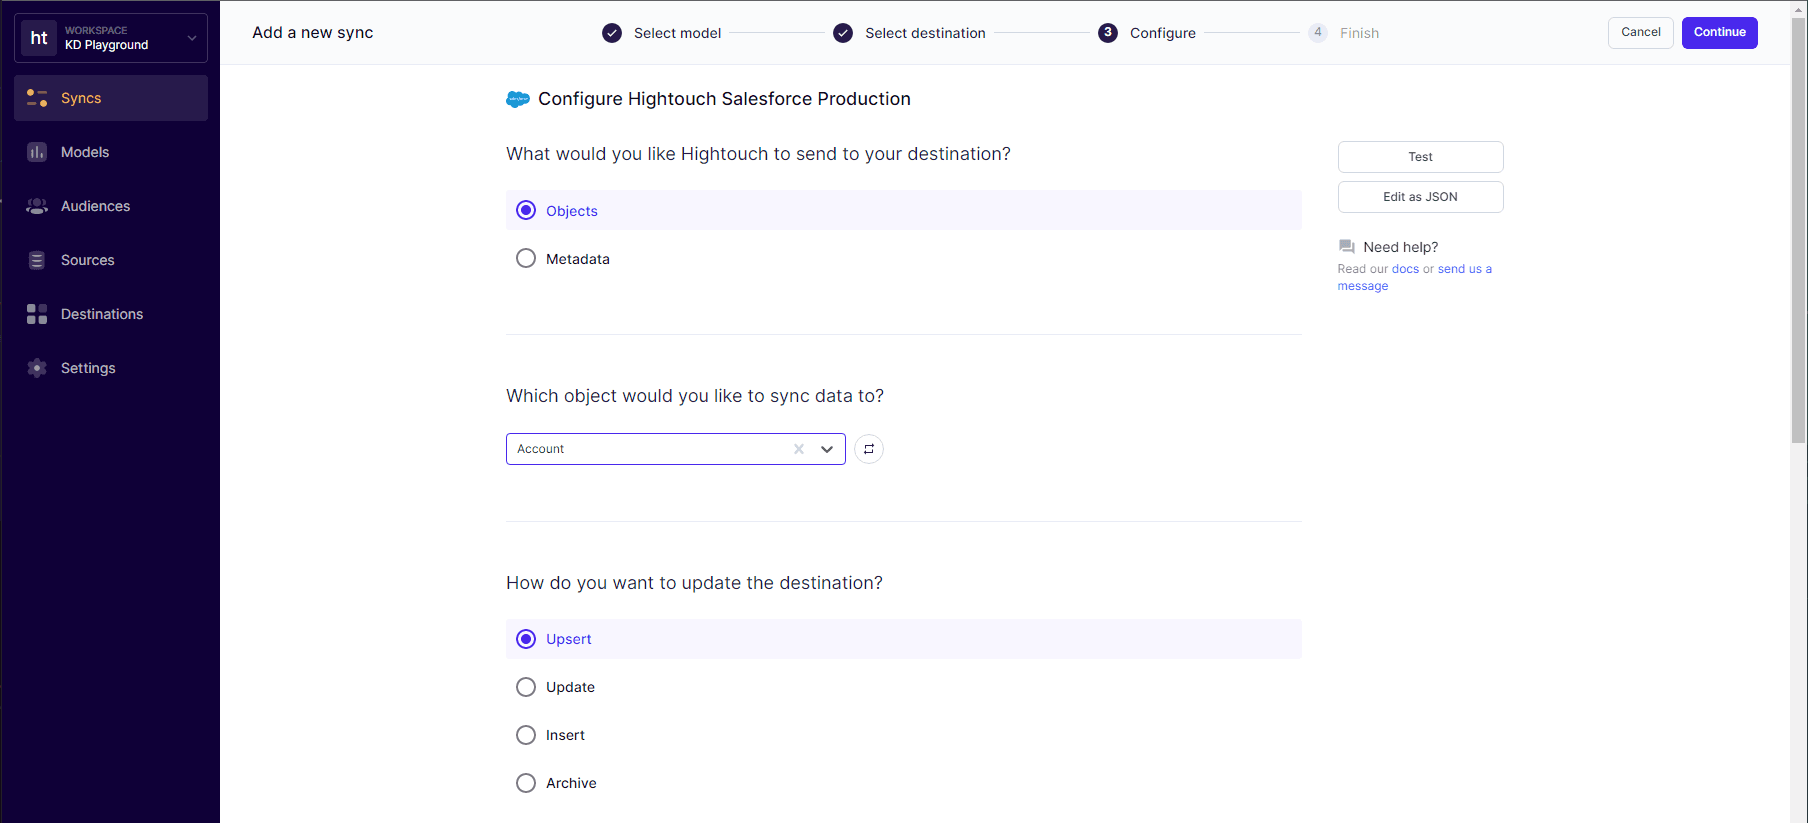
Step 4: Configure your sync
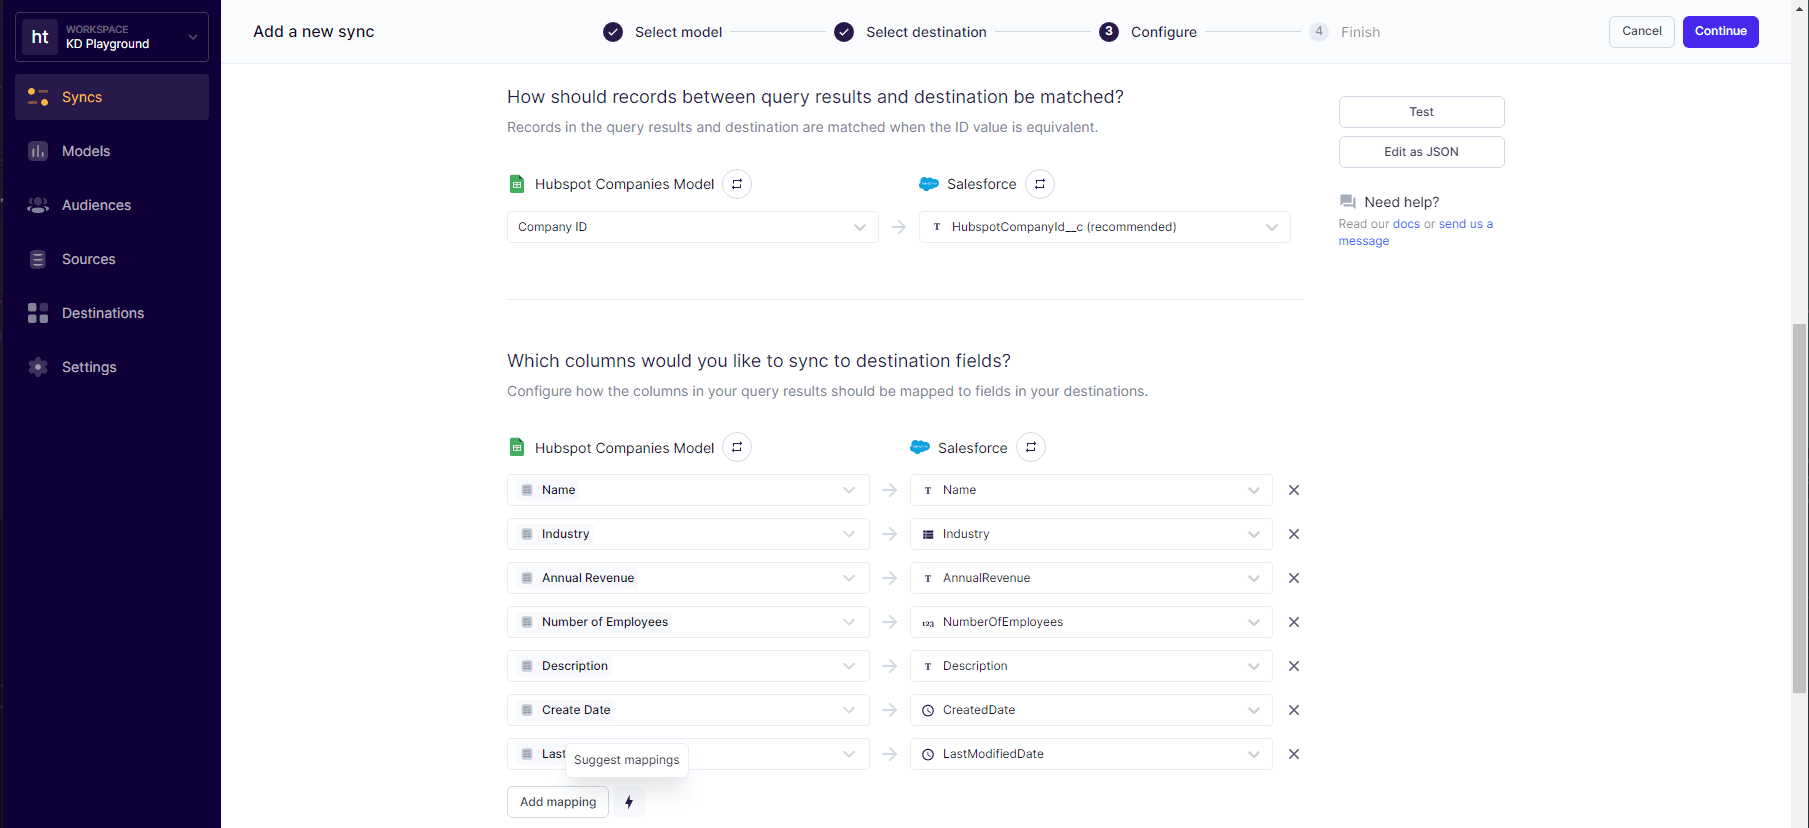
Once I had my source, destination, and model setup, all I had to do was configure my sync and choose how I wanted my data to appear in my end destination. I also needed to map the appropriate columns in my Google Sheet to the proper fields in Salesforce. In this case, I chose to use CompanyID as my primary key.
Step 5: Schedule your sync
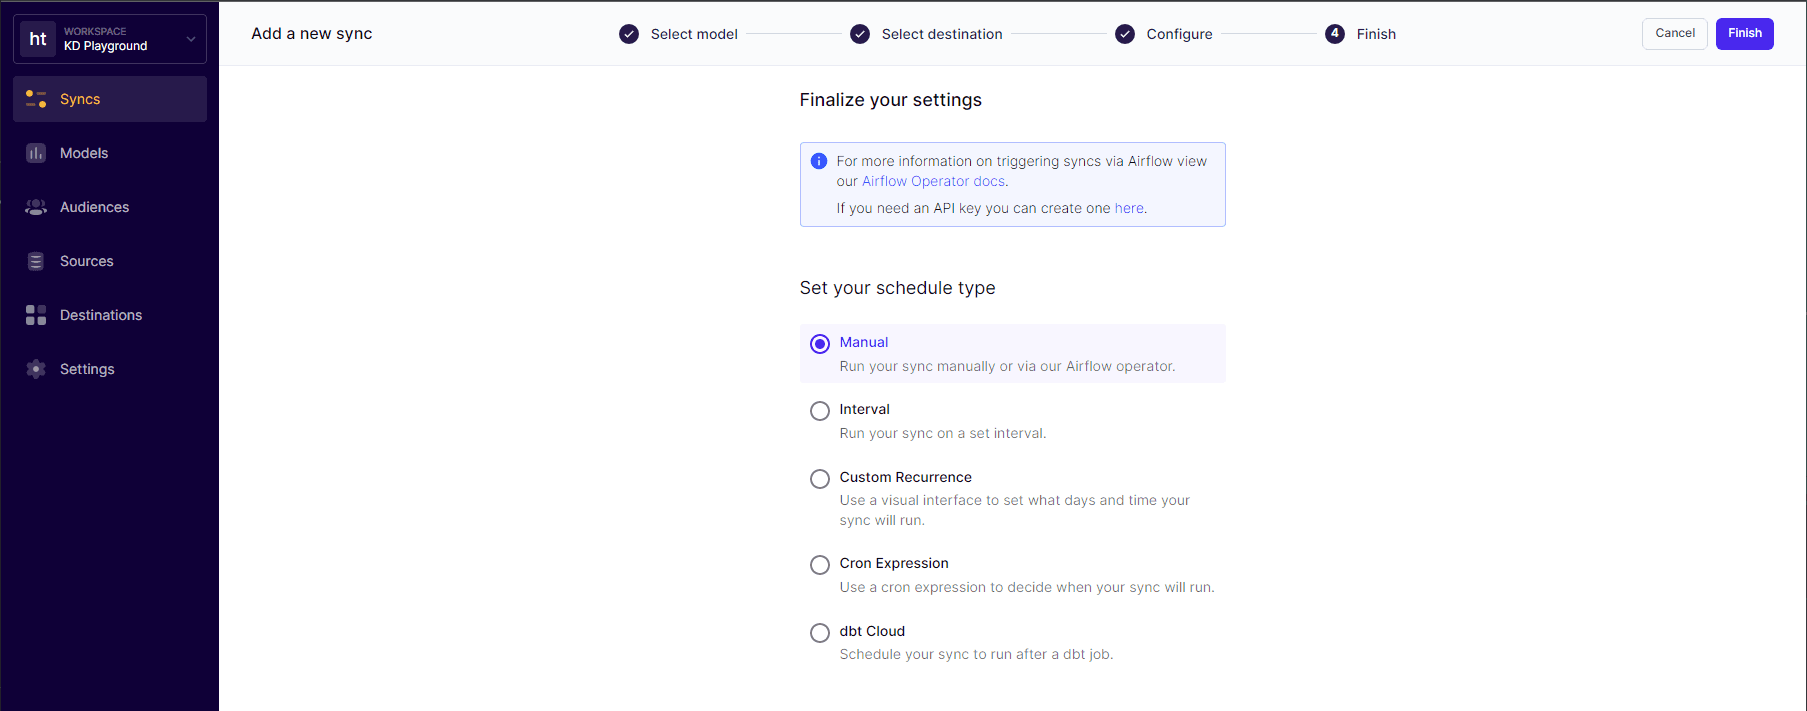
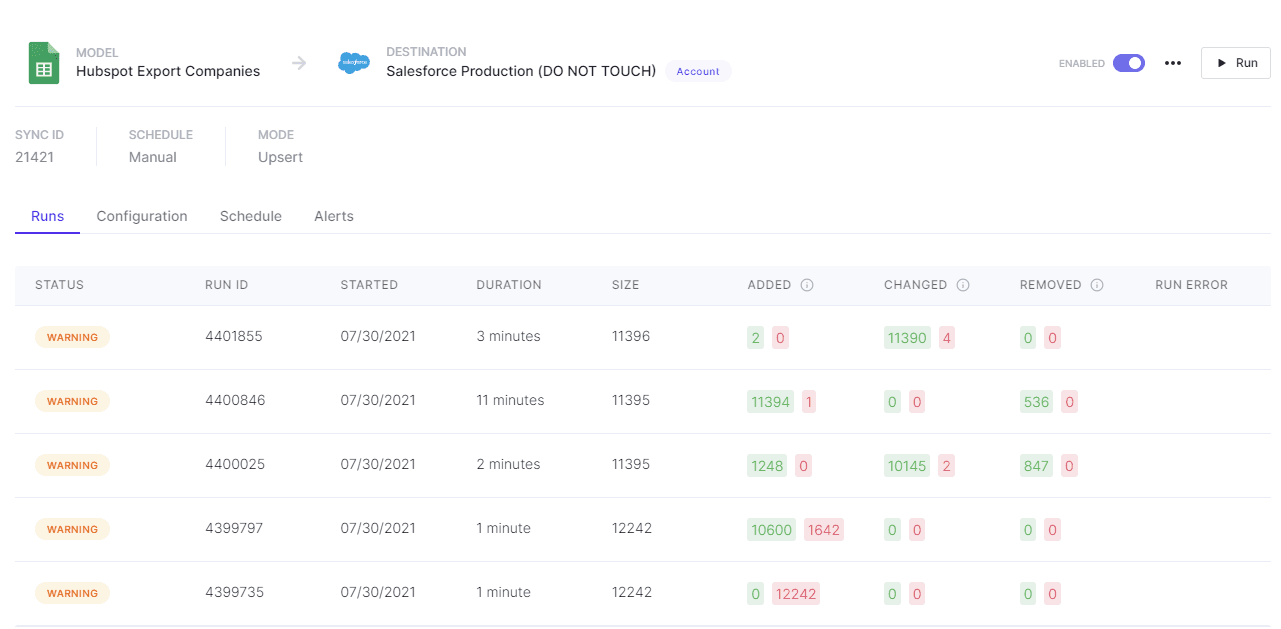
With everything set up, I chose when I wanted my sync to run. Since I was simply performing a CRM migration, it was only logical to do it manually. However, one of the cool features of Hightouch is that you can choose to run your syncs on a set interval, a custom recurrence, or even after a dbt job completes in your data warehouse. Modern data stacks make everyone’s life so much easier.
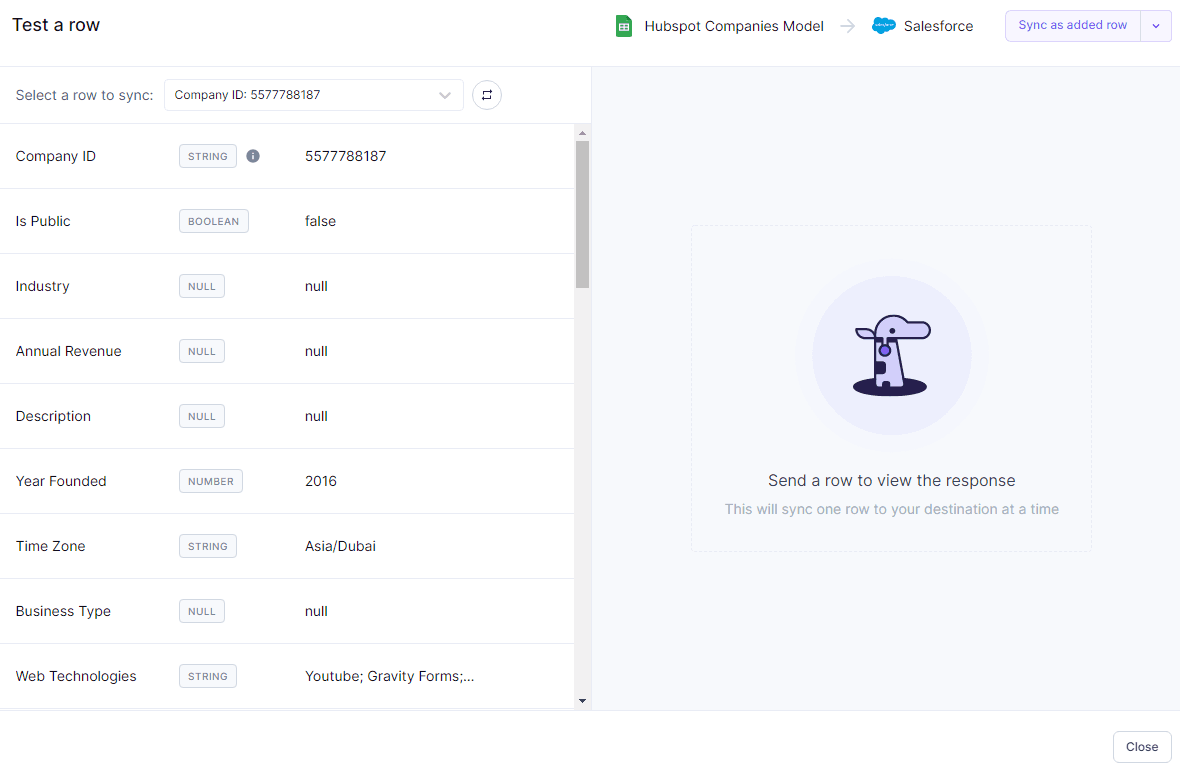
Step 6: Test and run
Before running my sync, I made sure to test a single row to ensure that all of the data was correct. Hightouch’s secret sauce allows you to detect added, changed, or removed records automatically. There were a couple of sticking points with Salesforce that I had to account for, specifically in the way that Salesforce deals with timestamps and the booleans in my spreadsheet. Instead of pulling my hair out, I simply updated my Google Sheet and hit “run” again. After five syncs, all of our data was loaded into a new and pristine Salesforce instance.
Closing Thoughts
After half a day and minimal data cleanup, I painlessly migrated all of our data from Hubspot into Salesforce. This was a night and day difference for me personally, as I’ve been through so many migrations in the past and never had such a smooth experience.
Every time I’ve used other mechanisms to migrate data I’ve run into some kind of issue. I may be cursed, but I’d like to think I’ve finally found that special tool that keeps the gremlins at bay.
I also want to say that my intention with this post is not to start a holy war between Hubspot fans or Salesforce fans. Both systems have their merits and can work effectively well for many different types of businesses. You could easily change the title of this post to: “How we Migrated from Salesforce to Hubspot.” The CRM is ultimately not the point of the article; it’s the ease of use Hightouch provides syncing data from one platform to another.
If you are interested in learning more about Hightouch, you can sign up for free or schedule a demo.